

connecting a generator to your home
Power outages can strike unexpectedly, leaving your home without light, heat, or access to essential appliances. Whether caused by storms, grid failures, or natural disasters, outages can disrupt daily life and create serious safety risks. In today’s world, electricity is more than a convenience — it’s essential for heating and cooling homes, keeping food fresh, staying connected, and powering critical devices.
A home generator provides a reliable solution by keeping essential systems running when the power grid fails. It offers energy independence and helps ensure safety, comfort, and peace of mind during blackouts.
However, connecting a generator to your home isn’t as simple as installing it. It requires proper planning, the right equipment, and strict attention to safety regulations. Knowing how to connect a generator correctly ensures you’re ready when the power goes out. MATCHUP will guide you step by step on choosing the right generator, connecting it safely to your home so you’re prepared for unexpected outages.

Why you might need a generator connection
When the power goes out, most homes are left without electricity, causing essential functions like heating, cooling, refrigeration, and communication to stop. While a generator provides backup power, it’s only effective if it’s properly connected to your home.
Stay powered during an outage
Power outages can last from a few hours to several days, especially as severe weather, utility failures, wildfires, and grid overloads become more common. A connected generator allows critical appliances and systems to keep running, including refrigerators and freezers to prevent food spoilage, heating or air conditioning to maintain safe indoor temperatures, medical equipment that requires constant power, pumps that help prevent basement flooding, and devices like Wi-Fi routers and phones to stay connected.
A generator connection helps maintain comfort and safety while waiting for utility services to be restored. Lights remain on, cooking is possible, and security systems stay active.
Protect your property
Certain home systems depend entirely on electricity. Without backup power, basements can flood, pipes may freeze and burst, and homes can become more vulnerable to break-ins. A connected generator helps protect your property and reduces the risk of costly damage.
Maintain productivity
For remote workers or home-based businesses, power outages can disrupt work and cause lost income. A generator connection keeps computers, internet, and office equipment operating, allowing productivity to continue during an outage.
The connection methods – from simple to seamless
There are several safe ways to connect a generator to your home, ranging from basic setups to more secure solutions. Understanding these options helps you choose the method that best fits your needs.
Heavy-duty extension cords (basic approach)
The simplest way to use a generator is by running outdoor-rated extension cords directly from the generator to specific appliances. This method works best when powering only a few essentials, such as a refrigerator, lights, or medical equipment.
For safety, choose extension cords with the correct gauge and length to prevent overheating. Keep cords outdoors or route them safely through windows, avoiding pinched doors and trip hazards. Never plug these cords into a wall outlet.
While this option is affordable and quick to set up, it’s not practical for whole-house power and requires careful cord placement and monitoring.
Transfer switch
What is a transfer switch?
A transfer switch is a device that safely connects a generator to your home’s electrical system. Its main function is to disconnect your home from the utility grid and connect it to generator power during an outage, then reconnect it once utility power is restored.
Why you need one
Connecting a generator to your home without a transfer switch is unsafe and often illegal. A transfer switch prevents backfeeding, a dangerous condition where generator power flows back into utility lines. Backfeeding can seriously injure utility workers, damage electrical equipment, and cause fires.
Plugging a generator directly into a wall outlet is extremely hazardous and must never be done. This practice can send electricity through utility lines, damage appliances, and overload home wiring. A transfer switch ensures generator power flows only where it’s intended and keeps your system compliant with electrical safety standards.
Types of transfer switches
Manual transfer switch
A manual transfer switch is commonly used with portable generators and requires you to manually switch your home’s power source from the utility to the generator during an outage. It is installed as a sub-panel next to your main breaker box by a licensed electrician and allows you to safely route generator power to selected circuits using dedicated breakers.
This option is inexpensive and straightforward, giving you control over which circuits receive power. It requires manual operation each time an outage occurs.
Key benefits include:
- Safe operation with no risk of backfeeding
- Ability to power hardwired appliances such as furnaces, well pumps, or water heaters
- Convenient control of multiple circuits from one location
The main considerations are the upfront cost and the need for professional installation, but it is widely recommended as a reliable and safe solution for homeowners.
Automatic transfer switch (ATS)
An automatic transfer switch is used with standby generators and is designed for fully hands-free operation. It detects a power outage, automatically starts the generator, and switches your home’s circuits within seconds.
This system provides fast, seamless power transfer and continuous backup without any manual action. While it is the most expensive option, it offers maximum convenience and safety, making it ideal for homes that rely on critical systems such as medical equipment or heating during outages.
Transfer switch vs. interlock kit
Interlock kit (cost-effective alternative)
An interlock kit is an alternative to a manual transfer switch. It is a mechanical device installed directly on your home’s main electrical panel that prevents the main breaker and the generator breaker from operating at the same time. This ensures that backfeeding cannot occur.
Interlock kits are generally more affordable than manual transfer switches, but they may not be approved in all areas and are not fully automated. Professional installation is still required, and users must understand their panel layout to operate the system correctly. Despite these limitations, an interlock kit is a practical option for homeowners upgrading from extension cords without the higher cost of a full transfer switch.
Advantages include:
- Lower cost compared to a manual transfer switch
- Provides the same protection against backfeeding
Key differences
Transfer switches are generally more user-friendly and are often considered safer, especially for larger or more complex setups. Interlock kits require greater familiarity with the electrical panel and manual operation.
By understanding these connection options — from basic setups to automatic systems — you can choose a solution that balances safety, convenience, and cost while ensuring your generator powers your home without putting anyone at risk.
Understanding your needs and choosing the right generator
Before purchasing a generator, it’s important to understand your home’s power needs. This helps ensure you choose a generator that can reliably support the appliances and systems that matter most during an outage.
Calculating power requirements
Start by identifying your critical loads — the appliances and devices you need to keep running. These commonly include refrigerators and freezers, well pumps or water systems, furnace fans or heating systems, essential lighting, medical devices, and sump pumps.
Next, account for both running watts and starting watts. Running watts refer to the continuous power an appliance needs, while starting watts are the extra surge required when motor-driven appliances start. Items such as refrigerators, air conditioners, and pumps often need higher starting power. For example, a refrigerator may use about 600 running watts but require up to 1,200 watts to start, while a well pump may run at 750 watts and surge to 1,500 watts. LED lights and electronics usually require only their running watts.
Once you’ve listed all critical appliances and their wattage, add the totals together. To allow for power surges and future needs, select a generator with at least 20% more capacity than your calculated total.
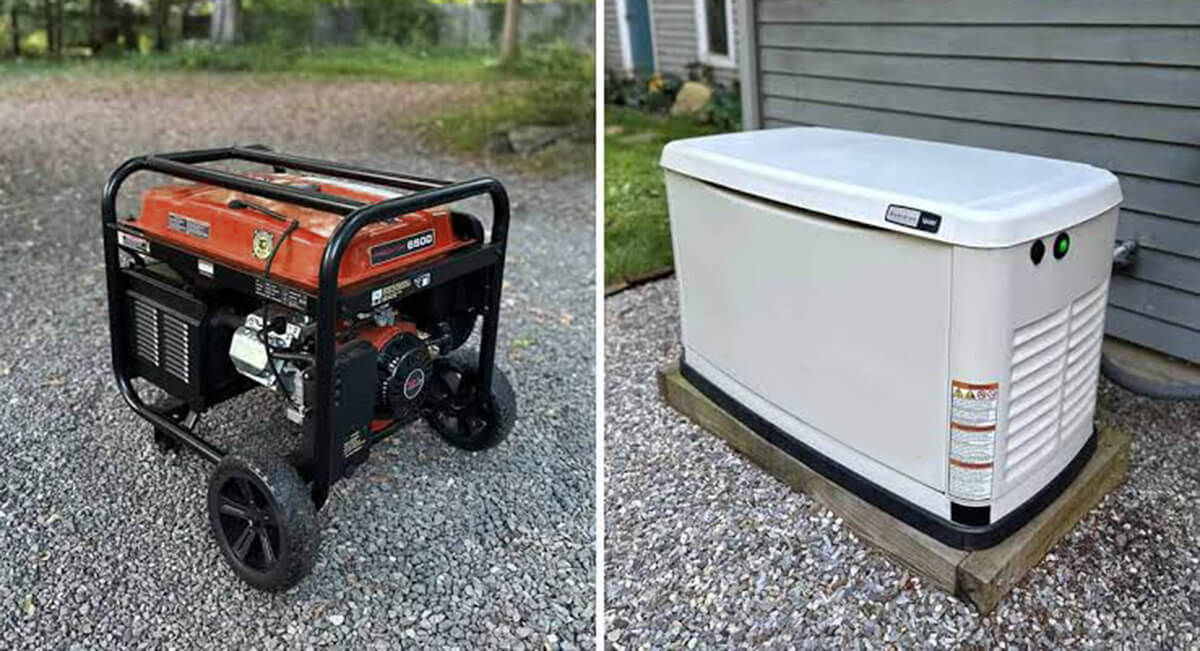
Choosing between portable and standby generators
After determining your power needs, decide which type of generator best fits your home and lifestyle.
Portable generators
Portable generators are more affordable, flexible, and easy to move. They are suitable for short-term outages or powering a limited number of essential appliances. However, they require manual setup, have limited output, need regular refueling during extended outages, and can be noisy.
Standby generators
Standby generators are permanently installed and provide automatic power to the home during an outage. When utility power goes out, the generator detects the outage within seconds and automatically supplies power. Once grid power is restored, the system switches back and shuts down the generator. They run on natural gas or propane, operate quietly, and switch on seamlessly. This seamless transition is controlled by an automatic transfer switch (ATS) installed near the electrical panel. While they involve higher costs, professional installation, and permanent placement, they are ideal for homes that require continuous and reliable backup power.
By assessing your critical appliances, understanding surge power requirements, and comparing generator types, you can choose a generator that keeps your home safe, comfortable, and powered during outages.
Connecting a portable generator to your home
The safest and most code-compliant way to connect a portable generator is by using a manual transfer switch or an approved interlock kit. These devices allow the generator to supply power directly to selected circuits in your electrical panel.
How to connect a portable generator correctly
Before starting, make sure you have the following:
- Manual transfer switch or interlock kit
- Outdoor inlet box for plugging in the generator
- Generator power cord rated for the generator’s amperage
- Portable generator sized for your power needs
- Fuel supply, such as gasoline or propane, depending on the generator
- Licensed electrician, recommended for installation
Step-by-step: using a manual transfer switch
- Have a qualified electrician install the transfer switch near your main electrical panel. It is connected to selected circuits such as refrigerators, lights, or sump pumps and prevents backfeeding to ensure safe operation.
- Install a weatherproof inlet box outside your home. This allows the generator to be plugged in without running cords through doors or windows and connects directly to the transfer switch using conduit.
- Use a heavy-duty generator power cord to connect the generator to the inlet box. Make sure the cord’s amperage rating matches the generator’s output, commonly 20 or 30 amps.
- Place the generator outdoors in a well-ventilated area at least 20 feet from your home. Add fuel, check the oil level, and start the generator according to the manufacturer’s instructions.
- Once the generator is running, use the manual transfer switch to move your selected circuits from utility power to generator power. Turn on only the circuits the generator can safely support.

Connecting a standby generator
The installation process
Connecting a standby generator is a complex process that must be handled by licensed professionals. The installation typically includes the following steps:
- Site assessment: A professional evaluates your home’s electrical needs and determines the best location for the generator. Considerations include distance from the electrical panel, clearance from doors and windows, and access to a fuel source.
- Permits and approvals: Local regulations often require permits for generator installation. Utility companies and homeowners associations may also have specific requirements that must be followed.
- Fuel line installation: The generator is connected to a natural gas line or a propane tank. This step is completed by a licensed plumber or gas technician to ensure a safe, leak-free connection.
- Electrical connections: An electrician installs the ATS and connects it to both the generator and the main electrical panel. During an outage, the switch transfers power to the generator and returns it to the utility once service is restored.
- Startup and testing: After installation, the system is tested to confirm proper operation. Most standby generators also perform automatic weekly self-tests to ensure readiness.
- Selecting circuits to power: The system can be configured to supply power to specific circuits or the entire home, depending on the generator’s capacity. Common circuits include heating and cooling systems, refrigerators and freezers, lighting in key areas, sump and well pumps, Wi-Fi and home office equipment, and medical devices. Whole-house systems manage electrical loads automatically or power all circuits based on capacity.
- Professional installation required: Because installation involves gas connections, high-voltage wiring, and code compliance, standby generators must be installed by licensed professionals. DIY installation can be dangerous, violate building codes, and void warranties.
Conclusion
A home generator is more than just a machine — it’s a safeguard for your family’s comfort, safety, and peace of mind during unexpected outages. Your choice should reflect your household’s needs: Portable generators are cost-effective and flexible for running a few essential appliances during short-term outages. Standby generators, paired with a transfer switch, provide whole-home coverage and seamless operation for families seeking reliable, uninterrupted power.
By assessing power requirements, selecting a safe connection method are critical steps in ensuring that generators transform from simple backup tool into a dependable source of security. So you can face power outages confidently, knowing your home remains powered, your family stays safe, and your comfort is preserved.
Frequently asked questions
How big of a generator do I need for my house?
The size depends on the power you want to run. A 5,000–7,500-watt generator can handle essentials like refrigerators, lights, and sump pumps. For whole-house coverage, you may need 10,000 watts or more, or consider a standby generator system.




May Ge
Outdoor Machinery Export Manager 6-Yr Exp 🌍 ∣ BSCI, EPA, EURO V, CE ∣ Generator, High-pressure Washer, Water Pump, Engine, Floor Scrubber ∣ 🚀 24/7 Second Reply
TAIZHOU BISON MACHINERY CO.,LTD | Ningbo University of Technology
Our related blog

generator oil change tips & tricks
Generator maintenance made easy: Step-by-step oil change tips and tricks to keep your backup power ready when you need it.

can you run a portable generator indoors?
Can you run a portable generator indoors? Learn about serious safety hazards and essential precautions every homeowner should know.

how to safely ground your generator
Protect your generator with proper grounding techniques to ensure their safety and optimal performance. This blog explains when and how to ground portable and standby generators safely and securely.

How long can a generator run
Curious how long a generator can run? Discover the factors that influence generator runtime, from fuel type to load capacity, in this comprehensive guide.